This content was translated by AI and may contain errors.
View in Deutsch
Treesoft CAD Distribution Plan Wizard
Add-on module for the automated creation of single-pole and all-pole distribution diagrams
If you frequently need to create distribution panel diagrams in single-pole or all-pole views, then this add-on module is just what you need. The Distribution Panel Wizard enables the automated creation of distribution panel diagrams based on an electrical installation plan designed with Treesoft CAD. Even without an electrical installation plan, you can quickly and easily generate your distribution panel diagrams using the wizard’s features.
Video: Treesoft CAD Distribution Plan Wizard Tutorial
In this video, we demonstrate how to automatically generate single-pole or all-pole distribution diagrams.
Overview of Features
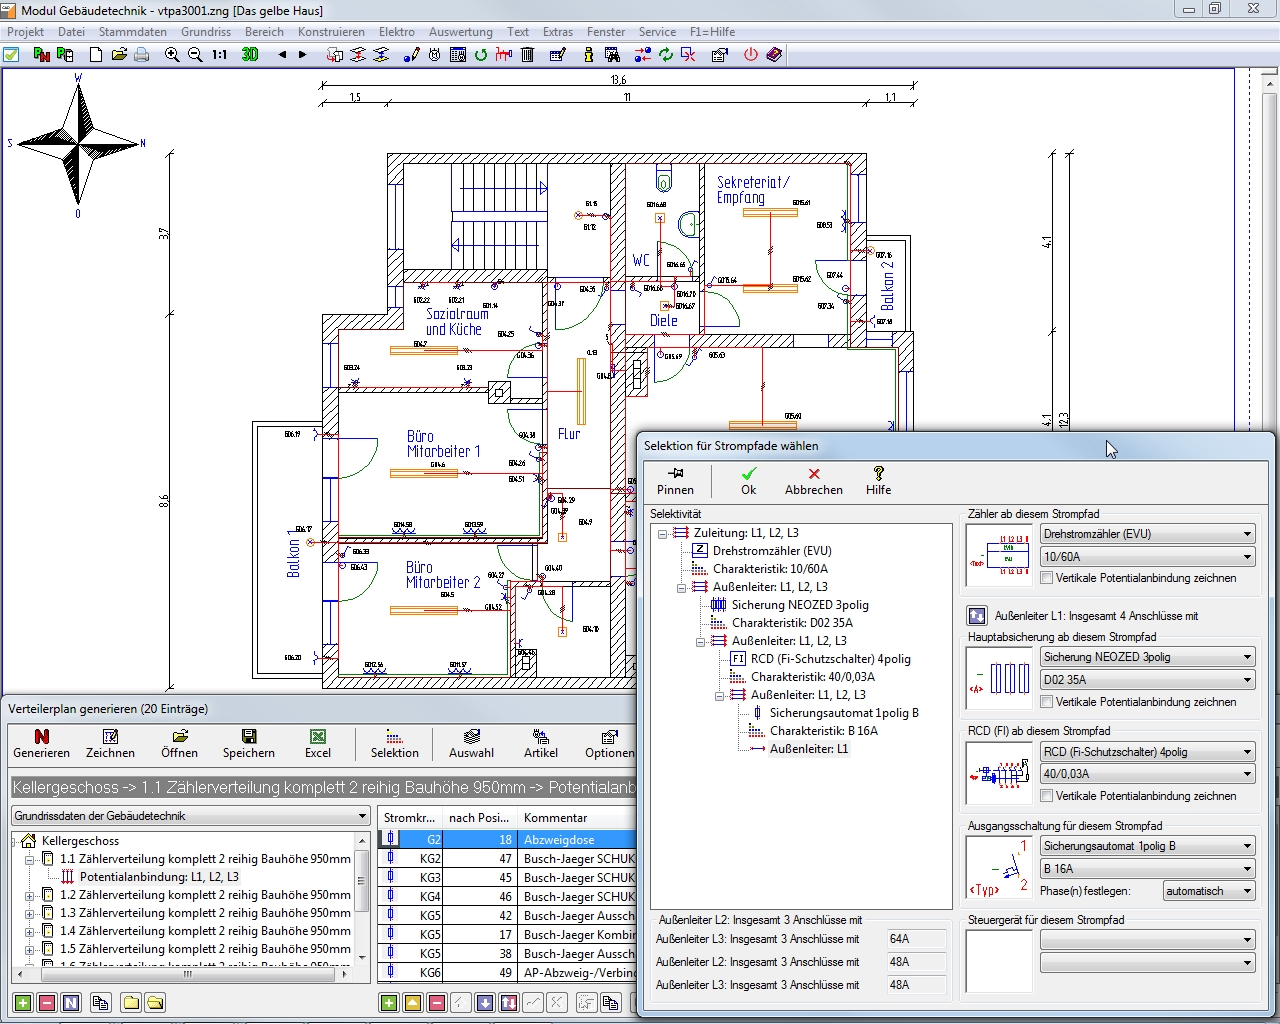
The Distribution Plan Wizard offers a wide range of functions for customizing the structure of your distribution plan. Editing is done in a clear, list-based format. The Distribution Plan Wizard then generates the corresponding distribution plan at the click of a button, based on the structure specified in the list. If desired, items can be automatically assigned and labeled with the technical data for each symbol. Different configurations of a distribution plan can be saved and, if desired, exported in Microsoft Excel format. The automatic creation and labeling of the distribution plan can be customized using a variety of settings.
Automatic generation of distribution plans from an electrical installation plan created with Treesoft CAD Building Services
Automatic generation of distribution plans from a list, with many useful automated features
Single-pole and all-pole representations of the distribution diagram
Global item assignment and automatic generation of bills of materials and terminal diagrams
Importing circuit lists via Microsoft Excel or CSV import interfaces
Video: Treesoft CAD Distribution Plan Assistant Feature Demo
In this video, we demonstrate how to automatically generate a distribution panel diagram from an electrical installation diagram.
In Treesoft CAD, you work on a project-by-project basis. After selecting an existing project or creating a new one, the software automatically saves all related drawing files—such as electrical installation plans, distribution panel diagrams, bills of materials, etc.—in the corresponding project directory.
Open the project and switch to the CAD tab in the document window. If you have just created the project, double-click “Create CAD Document Directory.”
To create a new distribution plan, double-click; the Distribution Plan Wizard will open and create a new distribution plan configuration.
After launching the Distribution Plan Wizard, you’ll see the Distribution Plan Editor at the bottom of the screen. It provides powerful features for creating and editing distribution plan configurations, such as creating new subprojects.
The distribution plan editor inserts current paths into the selected sub-distribution according to the settings you have specified and automatically increments the circuit and position numbers for the individual outputs.
Use the selection to define the configuration and connection of the individual outputs. The settings you specify always apply to the output selected in the list.
The Distribution Plan Wizard allows you to save the configuration you have set up in the Distribution Plan Editor so that you can reload it at a later time. The software saves the configuration in the corresponding project directory.
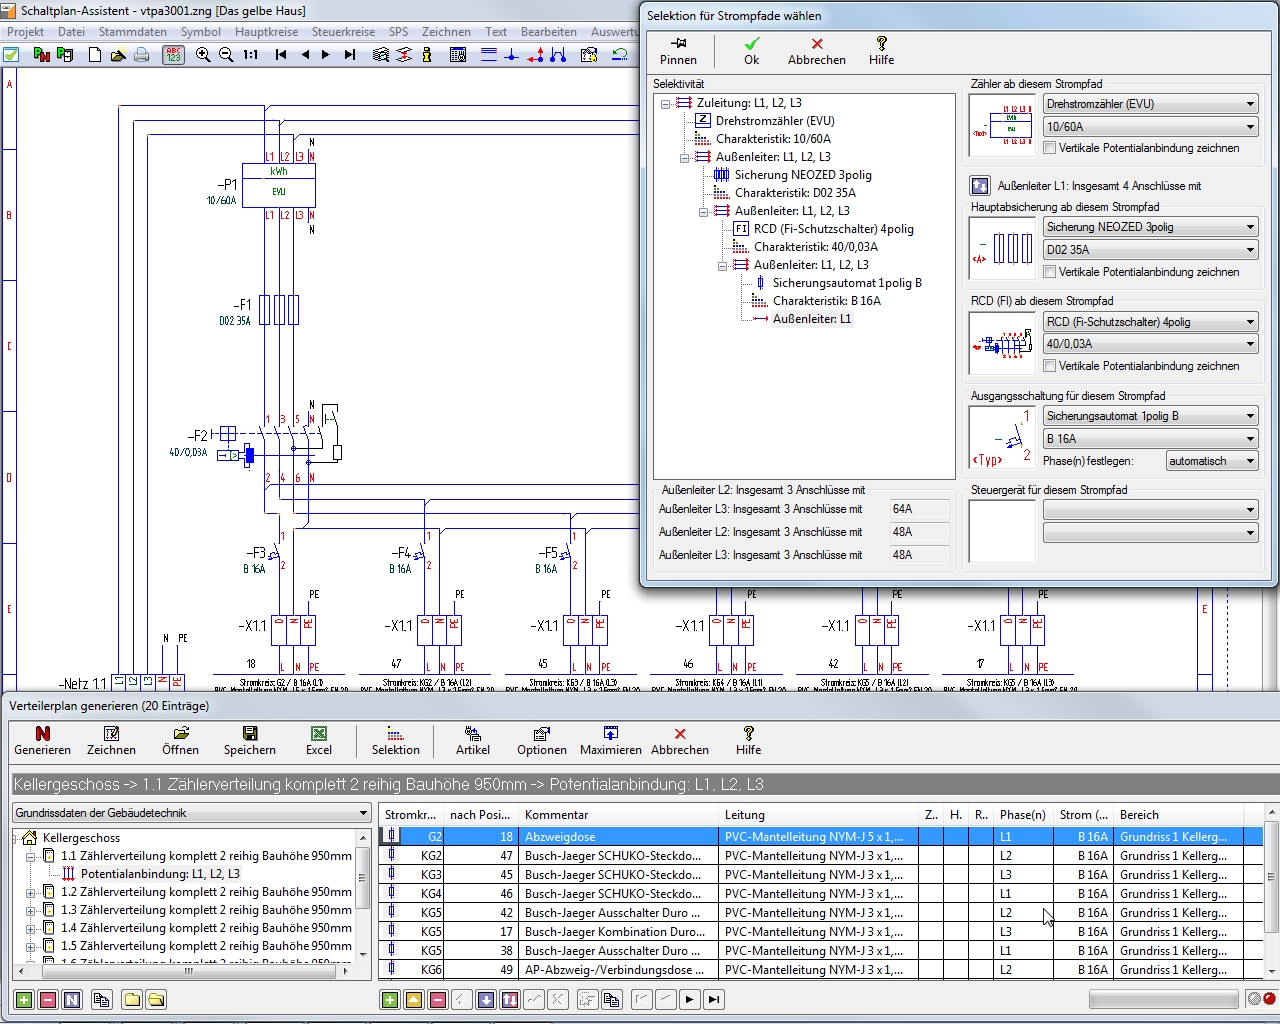
Based on the configuration created in the distribution plan editor, the distribution plan wizard generates the corresponding distribution plan in either a single-pole or all-pole representation. The creation of distribution plans can be customized to meet your specific operational requirements using a wide range of settings.
To create the distribution plan, click the “Generate” button in the distribution plan editor. The software will switch from the distribution plan wizard to the schematic wizard and create the distribution plan based on the configuration you previously set up. In the Schematic Wizard, you can also manually edit and/or supplement the automatically generated distribution plan as needed.
You can reopen the Distribution Plan Wizard either directly from the wizard selection ([F3] key) or via the “Main Circuits” menu using the “Edit Distribution Plans” command.
Open the Distribution Plan Wizard and launch the Distribution Plan Editor. In the Options dialog, click the “Displays” button. Here, you can customize the display of the current paths and switch between single-pole and all-pole (i.e., resolved) views.
If you have changed the display, you’ll need to regenerate the distribution plan. To create a new file, select the “New File” option and enter a brief descriptive text in the “Comment” field.
When creating a distribution plan manually by drawing it out, making changes—such as adding another outlet—can be quite time-consuming. However, with the Distribution Plan Wizard, this can be done easily.
Because the distribution plan is edited in list form, it’s very easy and quick to insert an outbound shipment, for example. The subsequent outbound shipments are automatically “shifted” accordingly, and the distribution plan is adjusted as needed. When the distribution plan is subsequently regenerated, the Distribution Plan Wizard automatically applies the changes made. It really doesn’t get any easier than this!
Of course, you can also manually edit, supplement, and analyze the distribution plan generated automatically by the Distribution Plan Wizard. This is done in the Schematic Wizard. Please note, however, that any manual changes or additions made to a distribution plan would be lost if you overwrite the existing file when subsequently regenerating the plan using the Distribution Plan Wizard. By default, however, the software always creates a new file—for example, vtpa1002.zng—when generating a distribution plan.
Image Gallery: Treesoft CAD Distribution Plan Wizard