What's New – Treesoft CRM
What’s New – Treesoft CRM 7.1

Foreword
Treesoft CRM 7.1 includes many improvements, functional enhancements, and completely new features.
Table of Contents
Address List:
New features in the address list and objectives
—
the address list is now 100% in Qt, Delphi has been eliminated
here
Display
address groups in a tree structure
Display
contacts associated with an address
Full-text search as the default setting
Direct access to address filters
Display of the active address filter
Pin
the address list
Create and edit
addresses
Create and edit
contacts
Deletion status completely revamped for addresses and contacts
Displayof deleted addresses/contacts
Custom column
display
Direct access to filters
marked as favorites
Multiple selection of addresses
Direct link to the geodata tool
Geodata Tool:
New Features in the Geodata Tool
Saving Settings
Filter Groups and Address Filters
Temporary Filter Group/Marker
Map in the Geodata Tool
Printing the Map
Google Earth Export
Duplicate Removal
New Development Duplicate Removal
Duplicate Search
User Guidance
Duplicate Resolution
Duplicate Groups
Create
Duplicate Groups
Edit
Duplicate Groups
Ignore Duplicates Based on Duplicate Groups
Start
Duplicate Resolution
Perform Duplicate
Resolution
Configuring
Duplicate Resolution
Excluding
Address Groups and Primary/Secondary Addresses
Configuring the History Entry
Setting the Deletion Status After Resolution Is Complete
Address List
New Features in the Address List and Goal Setting
The goal of the “New Address List Development” project was to completely eliminate the Delphi code, develop a unified address list for all the different parts of Treesoft Office, and make it easier and faster for you to work with different address groups. In version 7.0, there were 6 differently developed search lists that were called upon at 30 different points in the program. That’s now a thing of the past! There is now only one address list, which is called upon in all relevant functions, ensuring a consistent and faster user experience. You can look forward to it!
The address book is now 100% in Qt; Delphi has been phased out here
The address list, previously known as the “Address Search List,” was originally programmed in Delphi for Treesoft CRM. In version 7.1, we have now completely redeveloped it from scratch using 100% C++/Qt. The new address list is now even more intuitive to use and loads many times faster than the previous version as soon as you open it.
Display Address Groups in a Tree Structure
By clicking the “Show Address Groups” button, you can now view the groups in a tree structure in a separate window (on the left side of the dialog).
View the contact person for an address
Similarly, you can now use the “Show Contacts” button to display the contacts associated with the selected address directly in a list in a separate window (on the right side of the dialog).
Display the contact details for the contact person
Display the contact details for the contact person
You can view contact details (such as initials, position, department, etc.) by using the context menu (right-click on a column header). The settings are saved on a per-user basis and can be reset to a predefined default if necessary.
Full-text search as the default setting
By default, full-text search is now enabled when you open a new address window or access the address list.
Direct Call to Address Filters
Users can filter the display of addresses using various buttons. By default, all addresses are displayed in the address list. You can use the following buttons to filter the addresses in the address list by different criteria and display them:
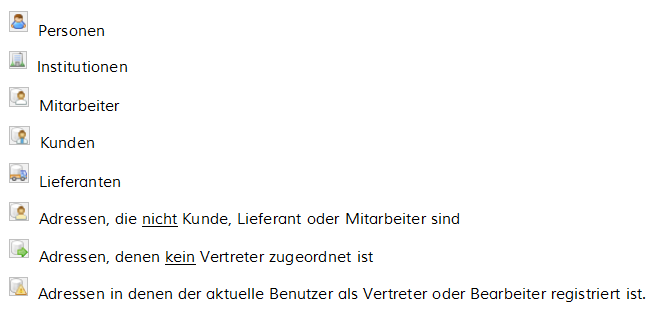
The buttons for filtering addresses have thus been moved from the separate filter bar directly into the address list, allowing direct access to these functions.
Displaying the active address filter
The title bar of the address list shows which address filter is active and how many addresses were found.
Pin the address list
You can use the “Pin” button to pin the address list so that it remains visible in the foreground at all times.
Create and Edit an Address
You can now create a new address or edit an existing one directly from the context menu in the address list.
Create and Edit Contacts
You can now also add a new contact directly to the contact list in the address book using the context menu.
Fire department status completely updated for address and contact person
With the 7.1 upgrade, you can now mark addresses as deleted directly from the context menu. This is done through the “Delete Status for Addresses” dialog box, where you can set the appropriate delete status. You can also use this same method to assign a delete status to individual contacts associated with an address.
Display of Deleted Addresses/Contacts
Addresses or contacts that were deleted previously can be viewed directly from the context menu in the address list. The addresses are color-coded differently depending on their deletion status (Archive, Review, and Delete).
Custom Column Display
It is now also possible to show or hide individual columns in the address list using a context menu. The settings are saved on a per-user basis and can be reset to a predefined default.
Direct access to filters marked as favorites
Using the drop-down menu on the Filter button, you can access and apply filters marked as favorites directly from the address list.
Selecting Multiple Addresses
You can select multiple addresses in the address list using the corresponding checkboxes. These can be shown or hidden via the context menu (Show Multiple Selection command). By default, the checkboxes for multiple selection are disabled, meaning they are not visible. Using the context menu, you can select, deselect, or invert the selection of all addresses displayed in the address list. The “Show Only Selected Addresses” command in the context menu limits the display in the address list to the selected addresses.
Assign multiple addresses/contacts to an entry or project
Assign multiple addresses/contacts to an entry or project
In one of the upcoming beta versions, it will also be possible to use the multi-select feature to assign multiple addresses and contacts directly to an entry or project.
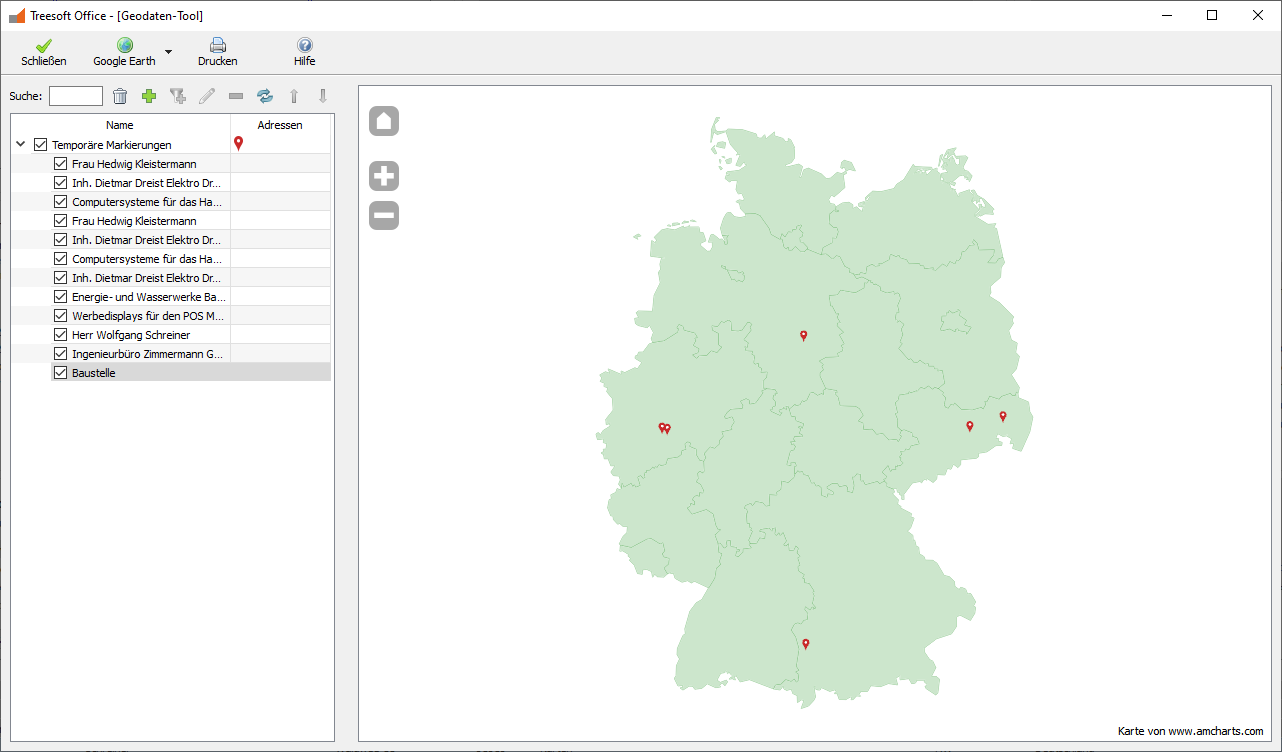
Direct link to the geodata tool
Using the “Show Selected Addresses in the Geodata Tool” command, the software transfers the address(es) selected in the address list to the Geodata Tool and displays them graphically on a map there.
Sending an Address to Google Earth
Sending an Address to Google Earth
The geodata tool can also use the Google Earth button to send a selected address directly to Google Earth and display it there graphically. In addition, the drop-down button allows you to export the data to a KML file.
Direct link to Google Maps
Direct link to Google Maps
Alternatively, you can use the context menu in the address list to view the selected address in Google Maps.
Geodata Tool
New Geodata Tool Development
Before we develop a new tool, we naturally check whether the existing one can be revised and updated. However, the geodata tool already implemented in Treesoft CRM did not meet our current requirements in terms of usability and graphical user interface. For this reason, we decided to completely redevelop the geodata tool, and you’ll see that this was the right decision. With the new geodata tool, we’ve placed the main focus on intuitive user guidance. The new geodata tool lets you display the locations of addresses on an interactive map or, alternatively, in Google Earth. You can view all addresses from predefined address filters or individual addresses. The new tool is intuitive to use, and the graphical user interface meets current standards. Using it is practically self-explanatory!
Saving the Settings
- The Geodata Tool now saves the window size and column width. The next time you open the Geodata Tool, it will reopen with the settings you have configured.
Filter Groups and Address Filters
- By saving configurations, you have direct access to different filter groups.
- When you delete a filter group, you'll be prompted to confirm the action. This helps prevent the accidental deletion of filter groups.
- When you delete a filter group, it is not deleted immediately; instead, it is marked as "to be deleted," similar to the process for deleting addresses and contacts.
- The deleted filter groups will no longer be displayed in the Geodata Tool. Of course, you can also undelete a filter group and thus make it visible again in the Geodata Tool.
- You can use the context menu to view the deleted filter groups and, if necessary, undelete them.
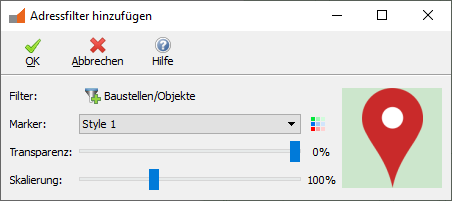
- In the Geodata Tool, you can assign multiple address filters to a single filter group. For example, you can add individual address filters for the different federal states to the "Sales Germany" filter group, allowing you to display the addresses on the map separately by federal state.
- To distinguish between the different address filters, you can assign each one a corresponding icon, as well as set its transparency and scaling. You can select the icons from a list of predefined symbols and colors. When selecting colors, the software uses the predefined primary colors.
Filter Groups and Address Filters
- The geodata tool saves filter groups and address filters globally so that they are available to all users.
- You can quickly find the filter group you want in the Geodata Tool using the Search field. For a clearer overview, you can manually sort the filter groups in the Geodata Tool so that the ones you use most often appear at the top of the list.
Temporary Filter Group/Marker
- When displaying the addresses selected in the address list in the Geodata Tool, the software creates a temporary filter group. This is displayed in addition to the filter groups created in the Geodata Tool. All of these addresses are displayed with a common, predefined icon.
Map of the Geodata Tool
- By checking the checkboxes at the top of the list, you can display the selected or filtered addresses on the map in the Geodata Tool. Currently, the Geodata Tool’s map is limited to Germany. The internal map is based on a map of Germany, on which you can display the individual federal states by double-clicking.
- We plan to expand the geodata tool for the international market to display foreign addresses on a world map.
Printing the Map
- Of course, you can also print the map—or a selected section of the map from the geodata tool—on your printer.
Duplicate Removal
New Development: Duplicate Removal
Avoiding duplicates in your address database plays an important role in master data maintenance. In the long run, these can not only lead to inconsistent data but also result in financial losses for you: Relevant and related customer data is scattered across multiple duplicates, which, in the worst-case scenario, can render the collected data useless to you. The sales department loses efficiency due to missing information. For example, the same customer might receive newsletters multiple times, which they may find annoying and cause them to distance themselves from you. The list could go on and on.
Treesoft CRM already had an automated duplicate removal feature. However, it no longer met our current requirements in terms of usability and graphical user interface. For this reason, we decided to completely redesign the duplicate removal feature, and you’ll see that, as with all our new developments, it was truly worth the effort.
The main objectives of the new duplicate removal process, compared to the previous Delphi implementation, were:
Developed 100% in the C++/Qt programming language
Intuitive to use
The graphical user interface must comply with current standards
The duplicate search is designed to provide significantly more reliable results
The process of identifying duplicates should be much faster
Removing the duplicates that were found should be self-explanatory
The new duplicate cleansing process (overall process) includes, on the one hand, the standard duplicate search feature for identifying duplicates and, on the other hand, the paid duplicate resolution feature—which must be purchased separately—for merging addresses.
Duplicate Search
Treesoft CRM’s standard feature set includes a powerful, easy-to-use duplicate search. The duplicate search refers to the automated identification of addresses in the address database that share a certain degree of similarity. The process of cleaning up such similar addresses falls under the category of duplicate resolution and is covered in a separate section (see Duplicate Resolution)
User Guidance
You can run the duplicate cleanup directly from the Address dialog by selecting the “Address” menu and choosing the “Duplicate Cleanup” command. In the dialog that appears, select the desired search range. You have the following options for finding duplicates:
For the address shown
For the currently filtered addresses
Select an address filter
For all addresses
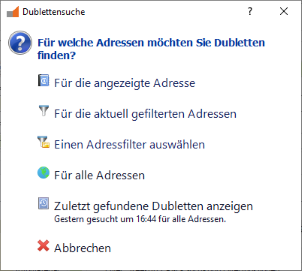
Alternatively, you can use the last option to display the duplicates found during the last search and continue editing them directly from there. The software searches the addresses for duplicates based on the selection you made and then displays them clearly in a separate dialog box. To help you categorize the duplicates found, each is assigned a color. These colors have the following meanings:

Addresses with minor discrepancies

Addresses with moderate deviation

Addresses with significant discrepancies
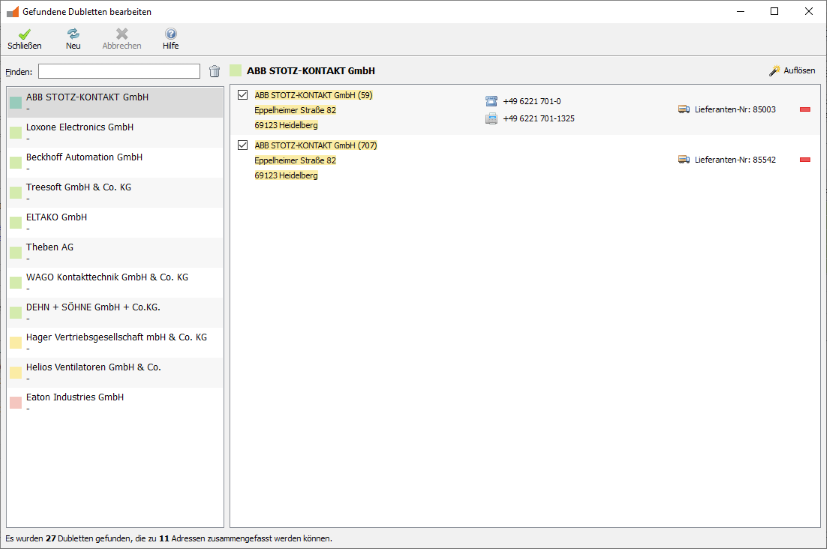
The following functions are available in this dialog box:

Resolving the duplicates found (see “Resolving Duplicates“)

Mark address(es) as not duplicates (see “Create Duplicate Groups“)

Start a new duplicate search
If you cancel the duplicate search, a message will inform you that not all existing duplicates may be displayed.
Duplicate Resolution
As described above (see “Duplicate Search”), Treesoft CRM already includes a powerful, easy-to-use duplicate search feature as standard. However, the resolution of duplicates is an add-on module for Treesoft CRM that must be purchased separately, which we would like to introduce to you here.
With the Treesoft CRM Duplicate Resolution feature, you have a simple and effective tool at your disposal to detect duplicates in Treesoft CRM and resolve them automatically and intelligently. This allows you to match the company names and address data of the duplicates. The Treesoft CRM Duplicate Resolution feature consolidates the desired information—such as address, customer, and supplier details, as well as contact persons and history entries—into the target record and creates a corresponding history entry documenting the action taken. The software supports you with an intuitive user interface and powerful features for fast and effective duplicate cleanup. You can customize the feature to your specific business needs using various settings.
Duplicate groups
It may happen that the duplicate search you run finds addresses that are very similar but are not actually duplicates. This can happen, for example, if multiple departments of a company have been created as separate addresses in the system, or if several different companies with various matching details (e.g., phone number) are located at the same address.
You can add these addresses to a shared duplicate group so that they are no longer displayed as duplicates and won’t be found again in the next search.
Create duplicate groups

Use this button to remove addresses that are not duplicates from the duplicate list. These addresses are moved to a designated duplicate group, where they can be reviewed later and edited if necessary (see Editing Duplicate Groups).
Edit Duplicate Groups
You can edit a duplicate group from the Address dialog box by selecting the “Duplicate Groups” command from the “Lists” menu. The following function is available for editing a duplicate group:
Use this button to remove individual addresses from the duplicate group. These addresses will then be found again during a subsequent duplicate search.
NOTE: If a duplicate group contains fewer than two addresses, it will be automatically deleted.
Ignoring Duplicates Based on Duplicate Groups
If multiple addresses have been identified as duplicates and are in the same duplicate group, they will no longer be displayed as duplicates.
Start Duplicate Resolution
You can access the duplicate removal feature from the following lists and dialog boxes:
Address List:
If multiple addresses are selected in the address list, you can use the context menu and the "Resolve Selected Duplicates" command to resolve the selected addresses.Edit
Found Duplicates Alternatively, after starting the duplicate search, you can access the duplicate resolution feature in the separate "Edit Found Duplicates" dialog box by clicking the following button:

- Here, too, the prerequisite is that at least two addresses are selected in the dialog —that is, the checkboxes next to them are checked.
In both cases, the marked addresses are resolved in a subsequent dialog box (see “Resolving Duplicates”).
Perform duplicate resolution
In the dialog box that appears next, select a template address to use as the basis for resolving the selected addresses. Normally, this is the oldest address—that is, the address with the lowest address number. Any conflicts that may arise but can be resolved—such as multiple existing customer numbers—must be resolved manually by you. Here, simply select the customer number to be assigned to the target address.If conflicts cannot be resolved—for example, due to different ERP mappings—duplicate resolution cannot be performed and the process will therefore be terminated with a corresponding message. In this case, you must manually resolve the existing conflicts in Treesoft CRM before calling the function.
Configure Duplicate Resolution
You can customize the duplicate resolution settings to meet your organization’s specific needs. The settings are configured in the Options dialog under the “Duplicate Resolution” section. These settings apply globally, meaning they are applied to all users.
Exclude address groups and primary/secondary addresses
By default, the duplicate check excludes address groups and primary/secondary addresses because there is a very high probability that the software would identify them as duplicates. However, this is usually not desired. If you want address groups and/or primary/secondary addresses to be included in the duplicate search, simply uncheck the corresponding checkboxes.

Configuring the History Entry
When a duplicate is resolved, the software automatically creates a corresponding history entry and logs the action performed. The history entry is linked to all the corresponding resolved addresses. Here, you specify the main group, group, and subject for the history entry to be created, and choose whether to automatically append the address numbers to the subject.

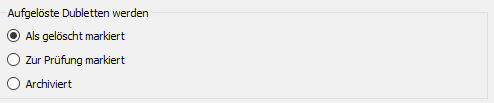
Set the deletion status after the reversal is complete
When resolving duplicates, the system automatically sets a deletion status for all selected addresses, with the exception of the destination address. In the Options dialog box, you can select the desired deletion status.
Questions?
We’re happy to help!
+49 2266 4763-850 · support@treesoft.de


