What's New – Treesoft CAD 7.2
Multi-monitor, ultrawide monitor, and HiDPI support
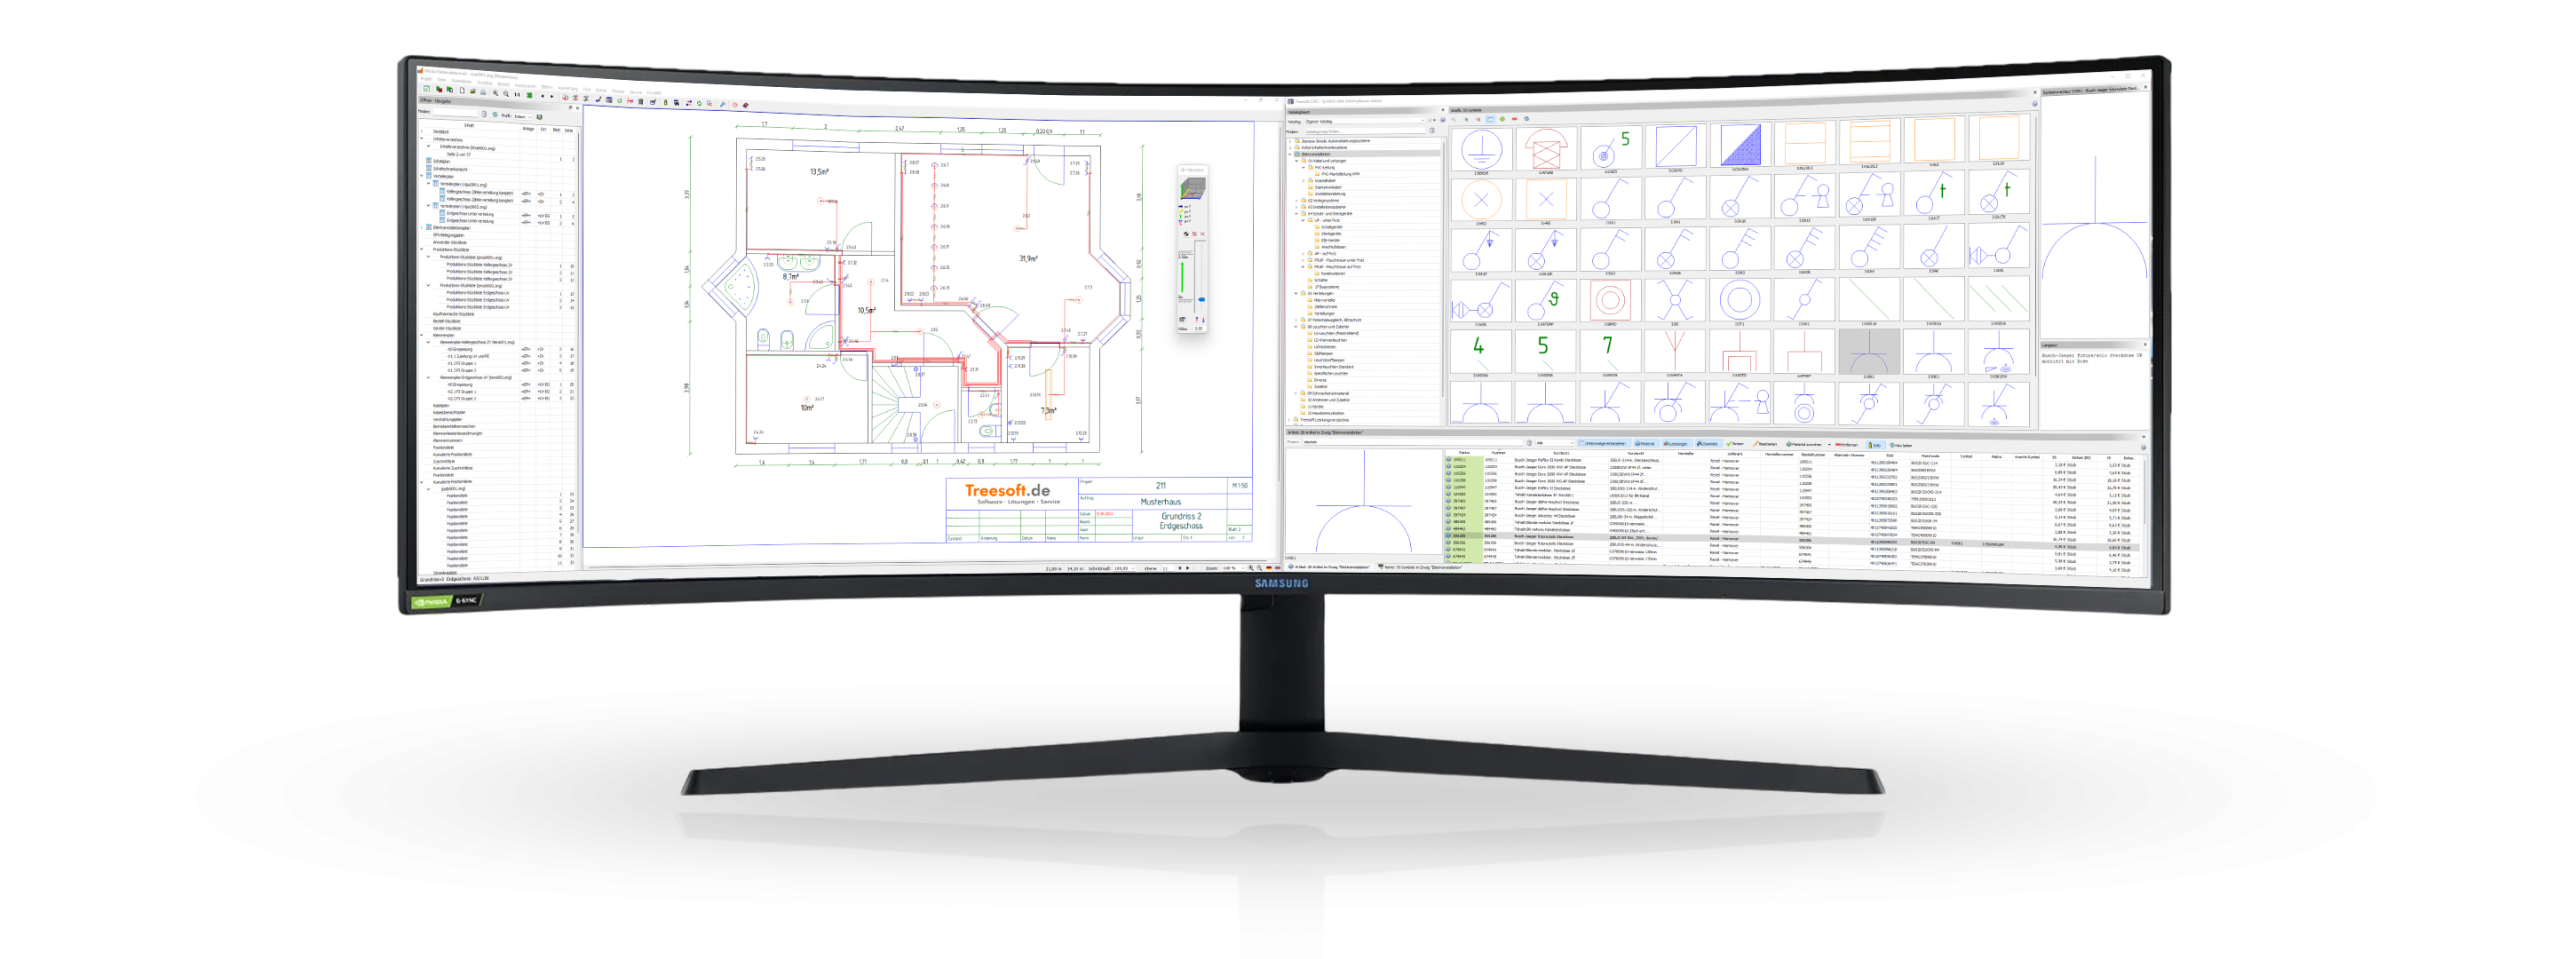
Treesoft Office’s screen management is continuously being enhanced and serves as the foundation for many new features in version 7.2. The flexible screen management in Treesoft Office 7.2 helps you easily arrange open windows across multiple screens or on an ultrawide monitor as you wish, and dock them back at the click of a button. In addition, support for the latest generation of HiDPI monitors has been significantly improved.
In my
personal opinion, the absolute best option right now is the 49-inch ultrawide monitors with a resolution of 5,120 x 1,440 pixels, such as the Samsung Odyssey G9, which I have on my own desk. Programs are displayed 1:1 without scaling, and although the pixel density is significantly lower than on a 4K monitor, the display quality is still incomparably good.
Set an icon on the catalog tree
With the upgrade to version 7.2, we have added the “Move Dock Window” dropdown button to the “Set Icon via Catalog Tree” function in the Catalog Tree dock window. The dropdown menu contains commands for moving and positioning the dock windows within a child window. Using this button, you can open all dock windows associated with the function in a single child window with just one click; this child window can then be moved to a second or third screen or positioned anywhere on an ultrawide monitor.
In the image above, you can see the Navigator docked to the drawing area on the left and the child window with the dock windows for the “Set Symbol via Catalog Tree” function on the right. Of course, you can also bring all windows back to the main screen with just one click to quickly make room for a window from another software application.
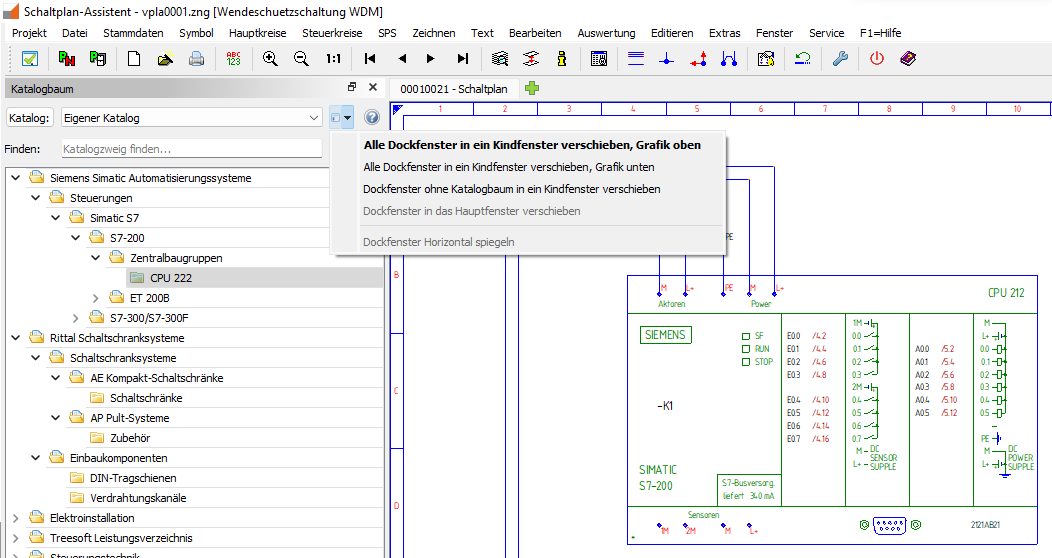
We’ve come up with a few special features to make the interface even easier to use, such as the “Flip Dock Window Horizontally” command. You can learn how this works and see what other cool features we’ve created for you by watching the webinar, reading the manual, or trying them out for yourself.
MDI (Multiple Document Interface)
With Treesoft Office Version 7.2, we have fulfilled the wishes of many customers and developed a Multiple Document Interface (MDI) with tabbed navigation for Treesoft CAD. This MDI makes it possible to open multiple schematics from different projects simultaneously in order to selectively copy specific areas or even entire sheets from a source drawing to the desired destination drawing.
You can define the settings for copying in a pop-up dialog. Equipment codes are copied unchanged, or symbolic equipment codes are generated from them. These can then be automatically replaced using the Text > Replace Symbolic Equipment Codes command, according to the generation rule set in the active project. Symbolic component codes can also be created from the cable codes, which are then automatically renumbered. Part numbers can either be carried over or deleted and subsequently reassigned. Everything is possible here, and circuit diagrams can be copied over in the blink of an eye—it doesn’t get any more convenient or faster than this.

This is definitely a feature you should have demonstrated during the webinar. Of course, you can also read up on all the options here, but you run the risk of overlooking things and leaving them unused. In the workshops at the Top Days, Treesoft’s annual in-house trade show, we hear the phrase “Oh my goodness, if only I’d known that sooner” time and time again. Unfortunately, this is often when customers realize that they’ve never fully exploited the capabilities of Treesoft CAD and have thus wasted a lot of time and money.
“Open Document” Dialog Box (Read-Only)
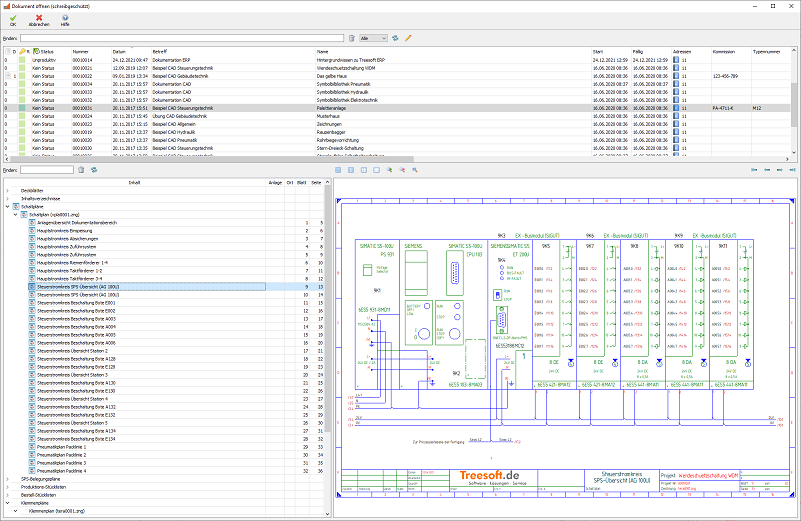
The “Open Document (Read-Only)” dialog box contains everything you need to find the schematic in existing projects from which you want to copy parts or entire sheets. This dialog combines the project list, the “Open – Navigator” dialog, and the preview window, which you’re already familiar with from the “Print” and “Export to PDF” dialogs. You can also switch the dialog to full-screen mode with a single mouse click, and that’s when finding the circuit diagram page you’re looking for becomes a breeze.
Treesoft CAD remembers your open tabs and automatically reopens the corresponding documents when you restart the program. It simply opens all drawings with standard template circuits in as many tabs as you like. After restarting, you’ll have direct access to your circuit libraries and can immediately start copying the circuit diagram.
File > Open – Navigator
The File > Open – Navigator menu command displays all documents associated with the project in a clear directory tree in a docked window. The following figures show the Open – Navigator dialog for a project in control engineering, a project in building services engineering, and, in each case, with an entry in the Find field to demonstrate the Find function.
 |
 |
This dialog box is packed with sophisticated technology. To understand just how high-performance the entire system has been designed to be, you need to briefly consider everything that’s happening here: The files are sorted correctly; the table of contents, attachments, and location codes (if available) for each sheet are extracted from the drawing file and displayed; and the pages of the entire project are numbered sequentially. In addition, the dialog box must determine how many floor plans or control cabinet views are stored in the corresponding drawing file and which layers should be displayed after opening.
In the first working version, opening the “Open – Navigator” dialog in the test project we created—which had a total of 1,651 pages—took nearly three minutes. Our developers then optimized the entire process and weren’t satisfied until they had reduced the time to less than one second. That’s truly fast enough.
“Find” Input Field
If you want to find a specific sheet in the schematic or a floor plan, simply enter the text here that you want to search for in the table fields. The displayed entries will be filtered immediately.
For example, entering .M13 will display only those sheets that contain .M13 in the asset identifier.
Profile List Box
The “Profile” drop-down list currently gives you access to the “Internal” and “Customer” profiles.
These profiles determine the order in which file types are displayed, which files are output, and which files are included in the sequential page numbering.
“Generate Table of Contents” button
You can now start generating the table of contents by clicking the “Generate Table of Contents” button here in the Open – Navigator dialog box.
Table of Contents
The table of contents is now generated for the entire project and includes not only the content summaries and the sheet number but also the page number. The content descriptions you entered in the schematic at the “Content1” and “Content2” placeholders are combined into a single text entry in the table of contents and displayed as left-aligned text at the “Content” placeholder.
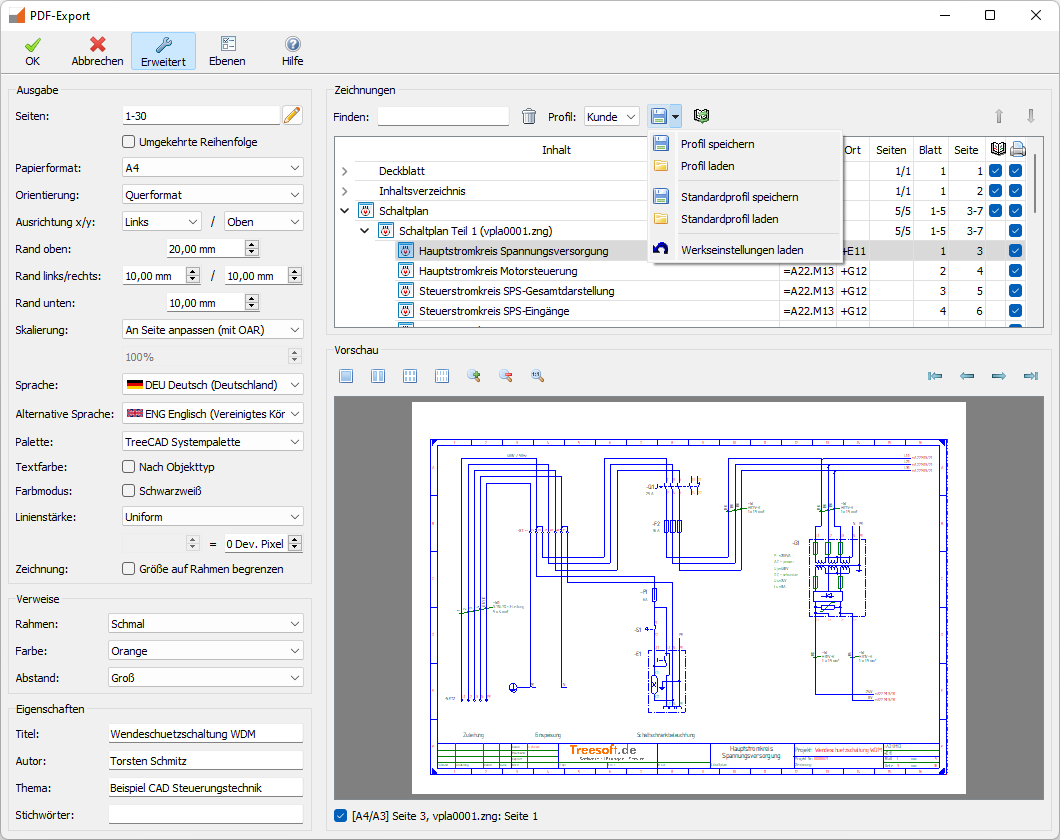
You can specify the document sorting order, what to output, and which documents should have consecutive page numbering in the profiles, which you can edit in the “Project Print” and “PDF Export” dialogs.
Generating the
table of contents is also highly efficient and takes less than four seconds in the test project we created, which has a total of 1,651 pages.
New Drawing Frame
To ensure that page numbers can also be displayed in the drawing frame, we have slightly redesigned the frame drawings and introduced the new placeholder texts “Page” and “NoPages” (which stands for “Number of pages”).

In addition, we have now included all the text in the frame drawings in English. These are or will be labeled in German by the program. Of course, we have also included these texts in our dictionary in German, English, French, Turkish, Russian, and Chinese. When the output language is changed, the frame texts are now displayed in the corresponding translation—a must-have for companies operating internationally.
Should we continue to use existing frame drawings?
Of course, the old frame drawings still work just as they did before, so you can continue working exactly as you have been; however, the new features for continuous page numbering throughout the entire project will remain unused.
To make things as easy as possible for you, we’ve revised all the frame drawings accordingly and included them as “New Frame Drawings.tcj.” In a standard installation, you’ll find this file at: C:\Program Files (x86)\Treesoft Office\Program\Projects. You can import the file as usual via Projects > Manage > Reconstruct. The project will then be named “New Frame Drawings.” Now you can select the revised drawing frames and copy them into your system project “CAD, Frame Drawings.”
If you don’t have time for this, no problem—just give us a call, and for a flat fee of 99.00 EUR, we’ll take care of everything for you.
Status bar with advanced functionality
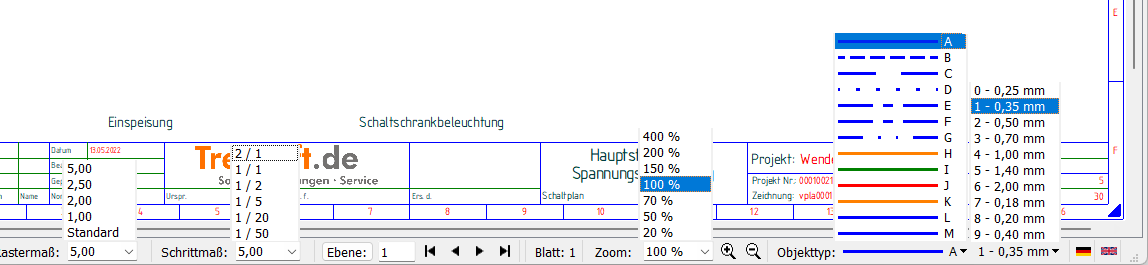
We have significantly enhanced the status bar at the bottom of the drawing as part of the upgrade to version 7.2. Frequently used functions—such as setting grid dimensions and increment sizes, zooming, switching between floor plans, views, or layers, and the line type and line width drop-down lists—are now accessible from the status bar, making them much faster to access.
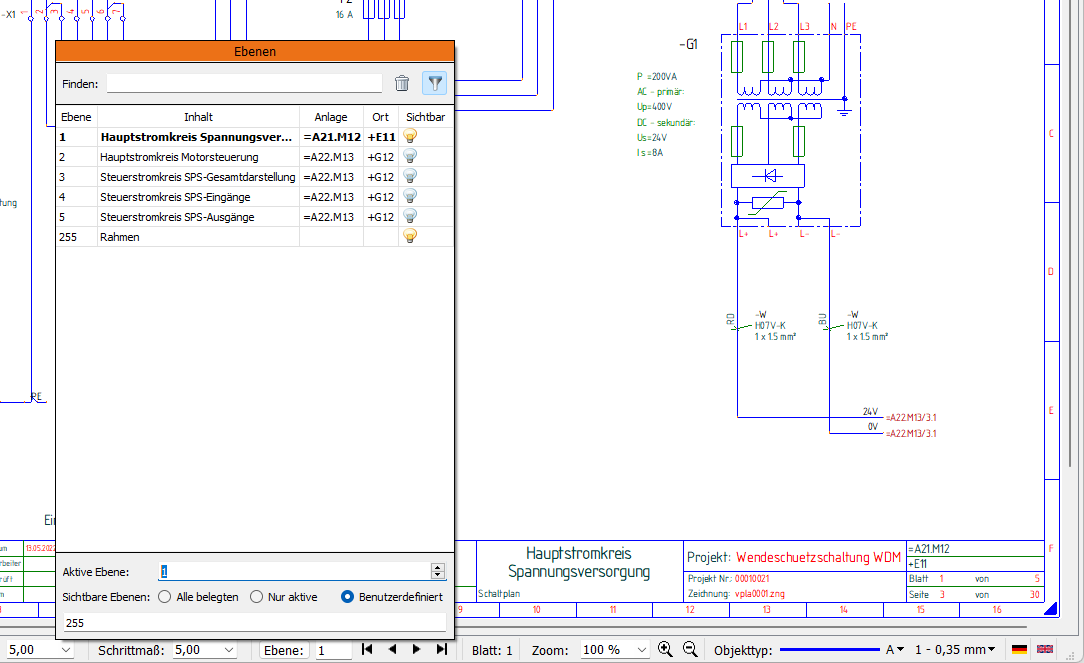
In addition to the buttons for navigating through the schematics, a comprehensive “Layers” pop-up dialog is now also available in the status bar. This dialog clearly displays all schematic pages in a document, along with the table of contents stored in the drawing frame and the extracted equipment and location identifiers. By clicking on the desired entry, you can quickly and easily navigate to the desired schematic page.
The command File > Toggle Layers, or the [E] key, now also opens the new “Layers” pop-up dialog.
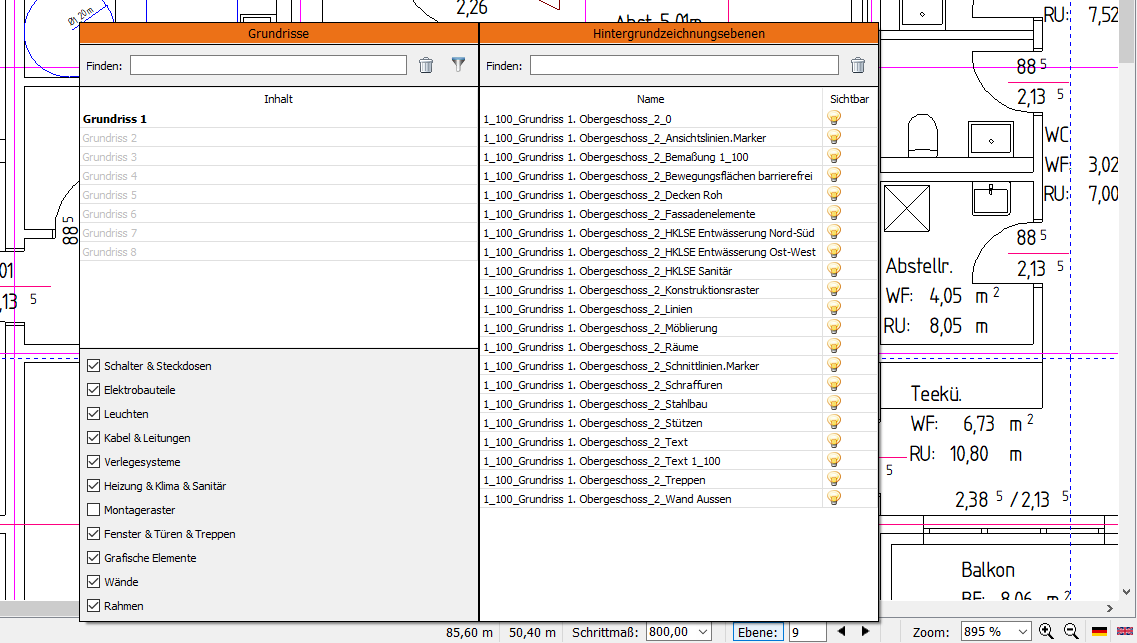
Of course, this dialog box is also available in Treesoft CAD Building Services (see “Import Floor Plans with All Layers”).
Import floor plans with all layers
With the upgrade to Treesoft Office 7.2, the background image in Treesoft CAD now consists of multiple layers. During conversion, you can now import all layers with their original labels. Using the newly implemented “Layers” pop-up dialog in Treesoft CAD Building Services, you can then toggle these layers on or off as desired.
Building Systems: Generate Analysis Lists
The “Evaluation” menu contains the commands “Items,” “Circuits,” “Connections,” and “Cable Types” for generating the corresponding lists. Previously, this menu simply opened the relevant dialog box. You would then select the floor plans and, for the item list, an additional group, before starting the evaluation and generating the lists.
By default, the active floor plan is always selected, and for the “Items” list, the “All Items” group is preselected. During the design phase, you almost always generate the lists based on the active floor plan. Over the past few years, we have continuously optimized Treesoft CAD, and computers haven’t gotten any slower, so we can now generate the lists immediately upon opening the dialog using the default settings. If you want to generate the lists across all floor plans at the end, simply enable the floor plans and restart the evaluation.
This saves a lot of mouse clicks during the design phase, optimizes the workflow, and simply makes you faster.
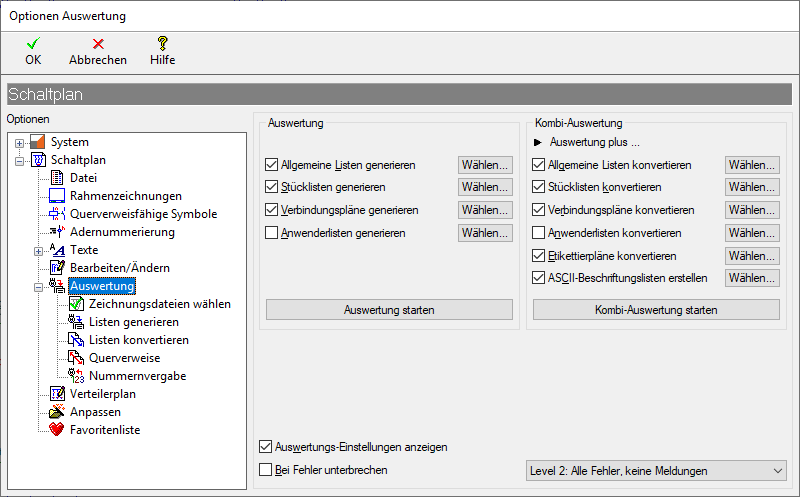
Context-Sensitive Calls to the Options Dialog
In the past, the list of commands in a menu usually ended with the “Settings” command. Clicking it would open a dialog box where you could configure the settings for the commands listed in the menu.
However, users often need to configure a large number of settings one after another—for example, after initially installing software or when creating a new user. For the reasons mentioned here, Treesoft—like many other software vendors—has consolidated all settings into a single Options dialog, with the individual settings organized in a tree structure that makes them quick to find and easy to access.
In principle, this approach is the right one, although we have now backtracked a bit. If there is a context-sensitive branch in the options dialog for a menu, we have added the “Options” command to that menu. Selecting this command opens the options dialog and directly highlights that branch.
Menu in the Schematic Wizard | Branch in the Options dialog box |
File | Circuit Diagram > File |
Symbol | System > Icon |
Drawing | System > Drawing |
Text | Circuit Diagram > Text |
Edit | Circuit Diagram > Edit/Modify |
Analysis | Circuit Diagram > Analysis |
Extras | Circuit Diagram > File |
Menus in the Control Cabinet Wizard |
|
File | Control Cabinet Assembly > File |
View | Control Cabinet Layout > View/Scale |
Area | Control Cabinet Layout > Section |
Design | Control Cabinet Design > Engineering |
Electrical System | Control Cabinet Assembly > Electrical Systems |
Extras | Control Cabinet Assembly |
Menus in the Building Systems Assistant |
|
Floor Plan | Building Systems > Floor Plan |
Area | Building Systems > Edit/Modify |
Electrical | Building Systems > Electrical Installation |
Analysis | Building Systems > Bill of Materials |
Extras | Building Systems |
If the selected branch has subbranches—such as Options > Schematic > Analysis—they are automatically expanded.
We quickly realized that this has helped speed up quite a few workflows. Sometimes you just have to take a step back to ultimately move forward. We’re confident that you’ll come to like this just as much as we do very soon.
Keyboard Shortcuts: Adaptations to New Standards
Treesoft CAD has been around for over 36 years now. Over the course of that time, new standards for command calls have continually emerged. We’ve taken this into account in each of our upgrades, ensuring that our software remains up to date and that you’ve only ever had to learn one or two new keyboard shortcuts—which are guaranteed to be used in a wide variety of other programs as well.
For example, I asked my son and one of his friends which keyboard shortcuts they would use to zoom. Both immediately answered [CTRL]+[+], [CTRL]+[-], and [CTRL]+[0] to set the zoom to 1:1. These keyboard shortcuts are used for these functions in all web browsers, and believe me, young people are all surfing the Internet, which is why they know these shortcuts. So if one of them ends up working with Treesoft CAD later on, they’ll know how to access these commands without even consulting a manual. The advantage for you is that you don’t have to memorize different keyboard shortcuts for identical commands in different programs, which is a good thing.
In the table below, we’ve listed all the updated command shortcuts for you:
Keyboard shortcut | Function | Through version 7.1 |
[CTRL]+[0] | Zoom 1:1 | Set Grid Reference Point |
[CTRL]+[+] | Zoom in |
|
[CTRL]+[-] | Zoom Out |
|
[B] | Area | Change pages |
[SHIFT]+[B] | Change pages |
|
[CTRL]+[ALT]+[0] | Set Grid Reference Point |
|
We had to change the keyboard shortcut for setting the grid reference point to [CTRL]+[ALT]+[0] in order to free up the [CTRL]+[0] shortcut for the Zoom 1:1 command.
We firmly believe that with the introduction of the Open – Navigator dialog, the Toggle Page command—now [SHIFT]+[B]—will be used far less frequently than the Range command—now [B].
All of this is part of workflow optimization, and it’s often the little things that, when taken together, significantly improve the overall work experience.
Questions?
We’re happy to help!
+49 2266 4763-850 · support@treesoft.de


